
You know when you kind of want to do clay, but not really anything of Importance? Well, I had that kind of afternoon. I’ve been making earrings for one of my daughter-in-laws and she mentioned that she had a friend who really liked “pink gold”. While I was walking my doggo the other morning, I saw a couple of young women taking photos of each other (dressed to the NINES at 0700 in the morning!) ALL their accessories and even the one girls birthday balloons were in “pink gold”. I told my dog, “Looks like Premo Copper to me and that is one of my favorite clays!”
So nothing rocket science here, just some of my favorite surface techniques (that don’t involve massive amounts of color).


So first up – the REAL No-Brainer. You know how when you are conditioning a Pearl or Metallic color you get all this yucky stuff before it smoothes into sheeted beauty?
Yep, that is what I used to make my “Wilma and Betty” earrings! Revenge of the really lazy clayer… These are actually my favorites.


So then I decided to do some of my striped clay. It is just sheeted clay that I alternate using the front and the edge of the striped pieces I’ve cut. YES, you can cut these and get a pretty smooth surface. You may have to cut 3 or 4 to get the hang of the width to cut, but it doesn’t take long.

I lay a thinner sheet on top and roll it lightly to adhere and then flip it all over.

Then all I have to do is cut out my circle and then cut the circle in half. I cut two smaller circles for the top of the earrings (Bonus! I could peel off the thinner back to add the post hardware between the two layers!)

I took my scraps and chopped them into little bits on a sheet of patty paper.

Then another piece of patty paper on top and a LOT of pressing with my coffee press knob thingie. I’m trying to press these into about the same thickness as the striped circles.

Fun fact! The bottom side always seems to be the better side! So I cut a smaller circle and cut that circle in half as well.

I drill all my holes after baking. The post hardware is sandwiched between the smaller striped circle and the larger smooth circle. The two half circles are glued together.

Now for a little mica shift action – with a twist at the end. Lightly sprayed my Sculpey stamp and embossed heavily into a small sheet of clay.

Now I’m going to shave the upper surfaces of the stamped pattern off.
BUT instead of discarding all those pesky little scraps….

I’m going to dump them onto another sheet of the Copper clay.
And then I cover that sheet with a piece of patty paper and use my acrylic roller to smooth the surfaces – from all four sides.

And LOOKIE! Mica shift scraps that create a really nice texture. I’m going to cut out the circles for the top of the earrings from this clay, plus a thinner circle behind to seal the post hardware between.
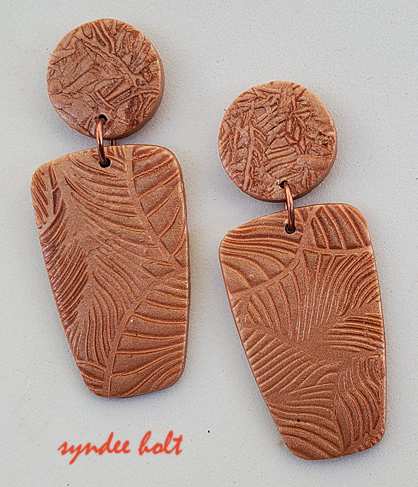

So one last pair…I used an Feather Wire Texture Tool (that is what you search under on Amazon) to scratch up the perfect nice surface of my medium thickness Copper clay.

I added a second slightly wider layer underneath. Laid a piece of deli paper on top and positioned my largest and smallest circle cutters (that small circle cutter is from the Sculpey Geometric Mini Cutter set – all those fit as the smallest cutter in each of the larger sets!)
Then I set my 4×5 piece of wood (actually scrap Trex) on top and push straight down. This gives me a slightly rounded edge on both the outside and the inside circles.
I also cut out two of the smaller circles using the deli paper on top and then two slightly larger, thinner circles of the plain sheeted copper for the top of the posts. I sandwiched my post hardware between these two circles.

But I can’t just bake these two circles upside down with the post sticking up because that bottom circle can fold or warp during baking. So this is why I collect cardboards. I made a double layer of small cardboard squares and used my Etch n Pearl to poke two holes in it and dropped the post into the holes. Now my clay is nice and flat to bake!
I actually tape the squares together and keep them for next time in my basket o’ baking cardboard.

Okay, that was my afternoon of earrings. Pink Gold that is light and oh so pretty…
