 I got to “drop in” on two different claying groups Zooms yesterday. While I was getting set to drop in on the first group (NWPCG), I was playing with some scraps and sliced it open and went OHHHHH! So naturally, freelancing a demo of “hey guys, look at this-it’s like a quick scrap version of Ikat” I had to leave their group and join my other group (Americans and Canadians that would have been at the Morrisburg Retreat). Then we really got to work on this cool little scrap technique.
So what do you need if YOU want to play along?
- 3-5 small pieces of clay (I’m using Souffle as usual),
- pasta machine
- clay blade
- cutters (I’m using the Sculpey Irregular Triangles and the Sculpey Circle Cutters)
- acrylic roller
- some patty paper or small pieces of paper
- findings for whatever you choose to make
The colors I chose were
- Souffle Cornflower,
- Igloo
- A mint that is Jade and Igloo about 1:8 (use Shamrock instead of Jade for a warmer mint). (I’m currently obsessed with mint for some reason)
- A pale yellow by mixing 1 part of Canary with about 6 parts of Igloo.
- I don’t honestly know what that green mix is – I suspect that it’s Shamrock mixed with a little Cinnamon.
You can also have handy – textures, paints, and all the fun stuff! And of course, a worksurface (I recycle paper from my printer)
Step 1:
 I just made little snakes of the colors. Note that some snakes are thicker than others? I wanted them to be bigger players in the mix.
Step 2:
 Twist the snakes so that the colors start to create vertical lines. (If you are using only 3 colors, two of the snakes will tend to just wrap around the third color and hide it). The goal is to get those stripes vertical, so push on the ends as needed to get them as vertical as possible. Then flatten the stripes with your hand so you can fit it through the pasta machine.
Step 3:
 Roll through the widest setting on the machine with the stripes vertical. I love the funkiness of stripes made this way! Gently fold the wonky piece of clay from the bottom to the top and run through the machine again. Don’t worry about matching stripes.
Step 4:
 Fold the same way, from bottom up, and roll through again. What we are doing is making the inside layers thinner and thinner. Now cut the stack in half and restack as shown. Note: you can also cut this stack in half either lengthwise or down the center and restack as well.
Step 5:

Cut thin slices off this stack and align them any way you wish! I find that I like to work on a small piece of paper or patty paper when I’m doing this part, so I can easily remove the sheet.
Step 6:
 Put a sheet of deli paper or clean paper over the strips and use the acrylic roller to GENTLY slide over the pieces and help seal them together. Carefully peel the papers away from the sheet of stripes.
Step 7:
 I chose to back my stripes on a medium width piece of Cornflower (that was handy). Then I used the largest Irregular Triangle to cut two pieces of my stripes. NOTE: If you are a stickler for mirrored images, you will need to turn the stack over and cut the second one from the back!
Step 8:
 I used the smallest circle cutter to cut a piece of the edge that I thought was interesting. I didn’t have room to cut a second one, but it’s SOUFFLE! That means that I could peel up another edge and move it to a piece of clay where I could cut a second circle! See the photo? I just peeled up a bit of clay and moved it to cut it.
Step 9:
 Before I peeled all the slices off the backing, I dug out my circle from the Sculpey Geometric mini-cutters and cut two more circles. Using the live edges again.
Step 10:
 I like to put a sheet of deli paper (or plastic wrap) over the pieces and gently rub the edges to soften the edges. A LOT EASIER THAN SANDING! lol
Step 11:
 I prefer to drill my holes after baking, so these guys got baked at 275 degrees for 30 minutes in a preheated oven. I bake on the cardboard pieces that I cut from my (many) Amazon boxes.
Step 12:
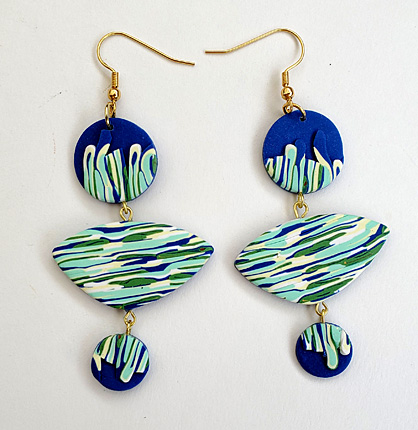
After baking, I drilled the holes and added the hardware to create earrings. Now, I don’t wear big earrings because one of my ears has a helix tattoo, so I’m really going to make a pendant from one of these.
WE EVEN TRIED A WOOD GRAIN!

The left heart is Souffle Cowboy and Latte. The right heart has small snakes of Cinnamon and Poppy Seed added. I stamped the left one with the wood grain from the Sculpey textures and added a wash of a Greige colored acrylic paint.
 Some more of the pieces I made with the scraps above and adding a little Robins Egg to the mix. My favorite all-time Natasha bead on the left. More examples of the technique above. The bottom pieces were a quick faux terrazzo I showed them.
I hope you have fun with this technique! Post for us all to see.
Also, if you have a Zoom clay event and you want me to drop in, just email me the day/time.
xoxo, syn
